Gravity Feed Pellet Rocket Stove
Our living space is in the region of 275m2 primarily heated using the two wood burners. Plus supplementary electric heaters for two of the children’s bedrooms. With our wood consumption averaging approximately 19m2 or 6 ‘cordes’ of dry logs per winter I needed to find an alternative method of heating.
What I made
The goal
Having installed underfloor heating tubes while renovating, the goal was to use some sort of water heating system to heat the space. My first thought was to use a geothermal heat exchanger, but the purchase and installation cost made this option impossible. The first ‘alternative’ solution I tried was a compost heating system, which I’m disappointed to say had mixed success.
This is my second alternative a wood pellet rocket stove that I built, it’s gravity fed and runs pretty much unattended for around 12 hours on a 15kg bag of wood pellets.
It heats water which is fed, via a 60 litre header, tank to the underfloor heating system.
In operation for the past 4 months, and I’m happy so far with the results. There are a few small issues which need to be worked on, but on the whole it does a good job.
My Gravity feed wood pellet rocket stove construction
- Burner unit constructed from fire bricks and angle iron
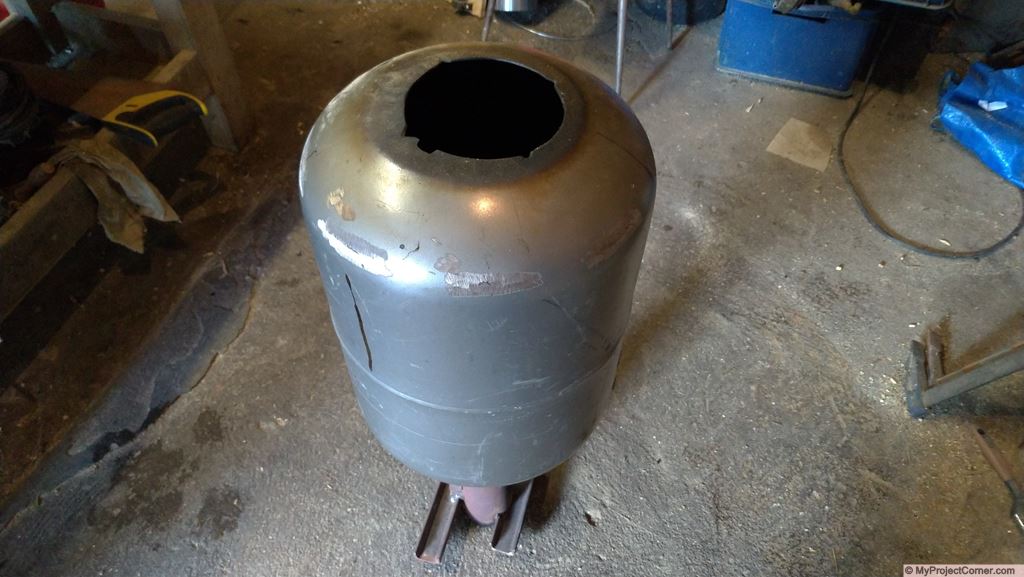
- Old 15kg gas bottle converted into feed hopper (I followed this guide)
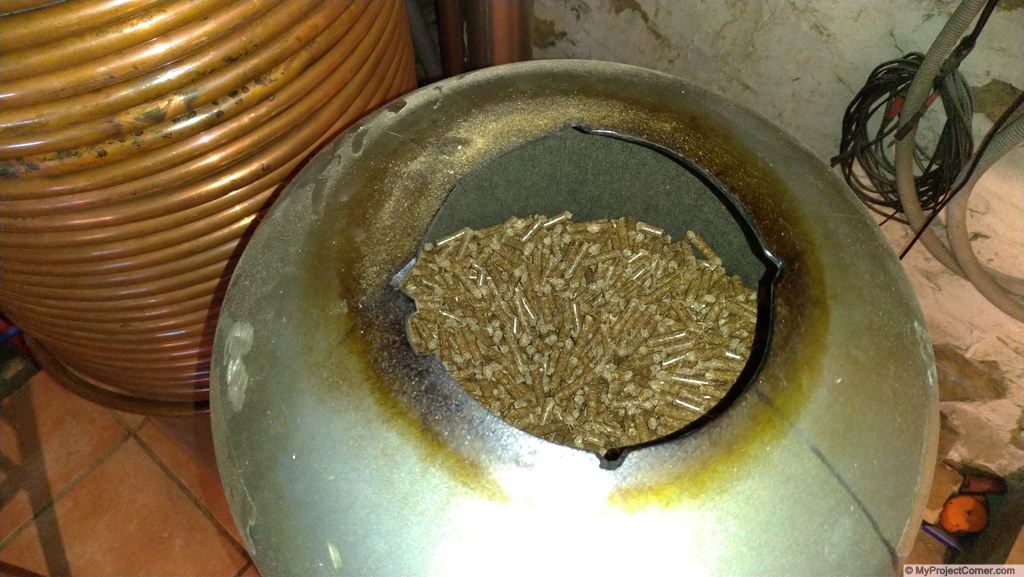
- Copper tubing coiled around converted stainless steel water tank
- Arduino connected to servo to clear ash build up
Constructing the fire box
The Rocket Stove Fire Box
After the usual web and YouTube searches, I decided that I would try to build a version of a rocket stove that would burn wood pellets. Using fire bricks for the fire box. Most of the builds that I had come across were built using welded steel box section. Although I am a fairly capable welder, the materials needed were not readily available.
Also, I had already built fire boxes using fire bricks and thought that the heat resistance and insulation qualities could provide a better, higher temperature burn.
Building The Fire Box
This is my rocket stove fire box design. I wanted to build a sort of modular pellet stove, not a single welded assembly, as is the case with a lot of the examples I’ve seen online. I wanted to be able to readily modify, change and replace component parts if needed.
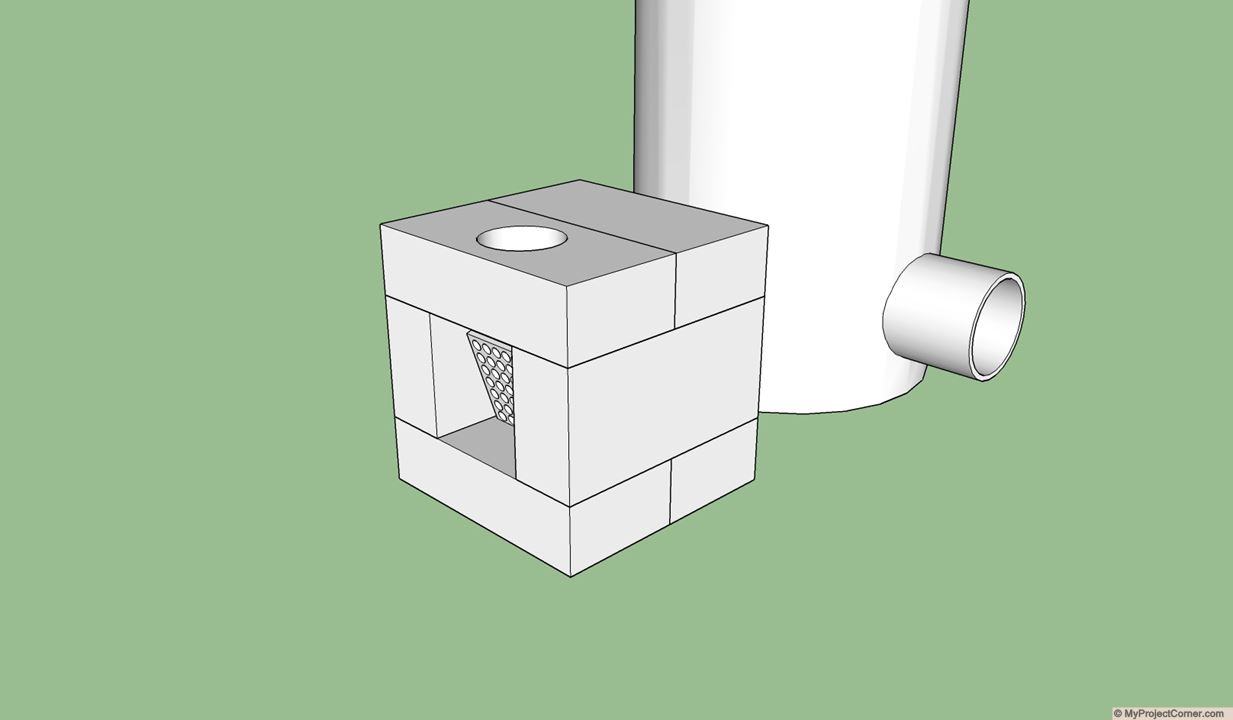
The construction is very basic, 6 fire bricks arranged as seen in my Sketch-Up model. The fire bricks are standard (here in France) 220mm x 110mm x 60 mm. Which means when arranged as shown it leaves a square hole 110mm x 100.
Having already used fire bricks in home built wood burners, I thought I would try for this project. Also they are really cheap, €1.40 each from Leroy Merlin DIY store
Drilling the fire brick
Probably the most difficult part was the drilling of a 70mm hole through one of the fire bricks to allow for the pellet feed pipe. This was achieved using a pillar drill and a masonry hole cutter. At my first attempt I killed the cutter, these bricks are really tough, it stopped cutting after reaching a depth of only 5mm.
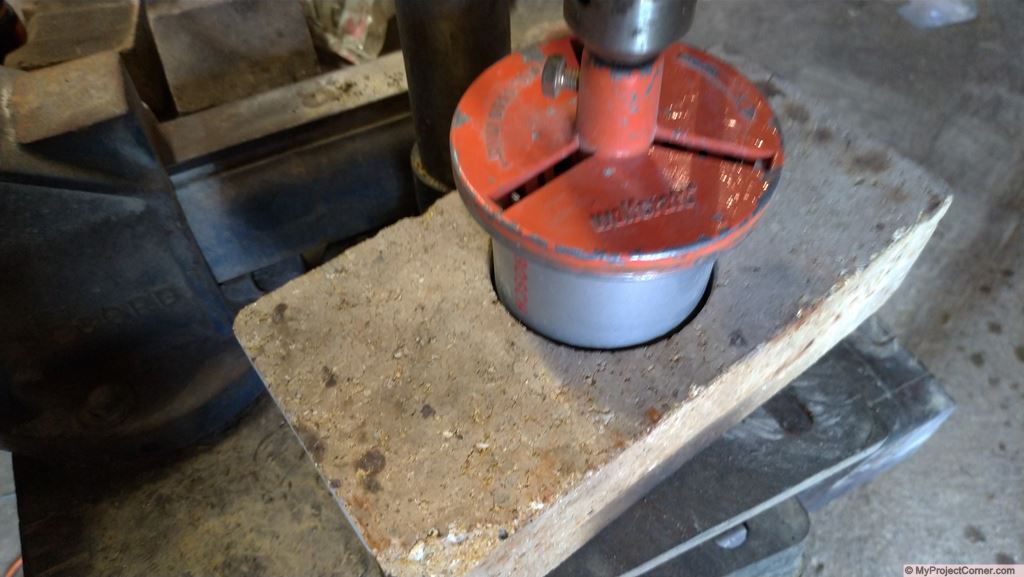
After getting a new hole cutter, and connected up a hose pipe this time. Drilling on the slowest speed, with a constant flow of water on the cutting edge I was cutting. It wasn’t quick, but it was cutting. Having drilled the pilot/guide hole all the way through first the large hole was drilled half way through from each side.
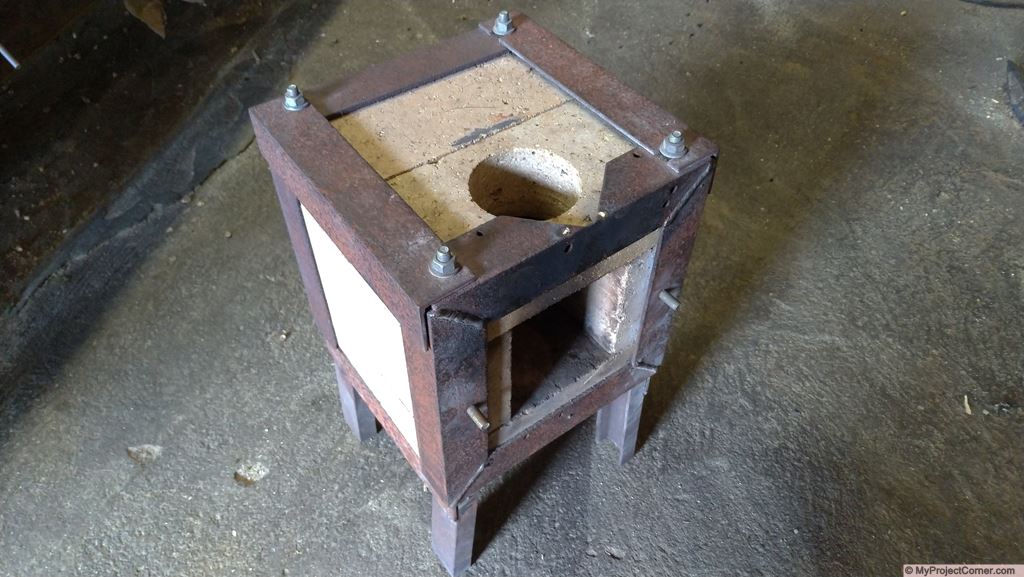
Making the Framework
I made up the framework for the rocket stove fire box out of steel angle 40 x 40 x 4 mm (recovered from an old barn door)
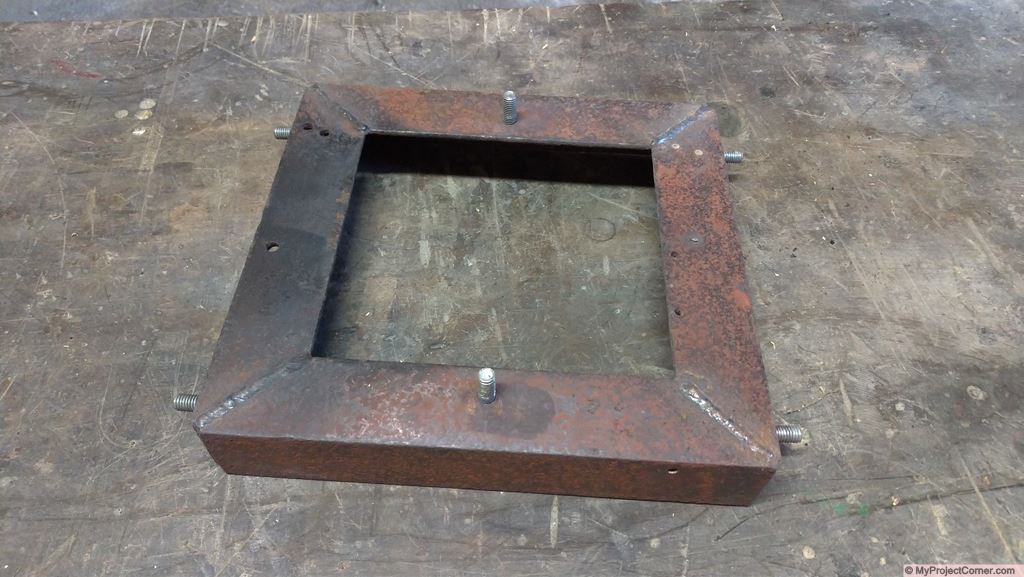
- Start by making up two end plates. Including studs to attach securing angles, flue pipe & servo assembly
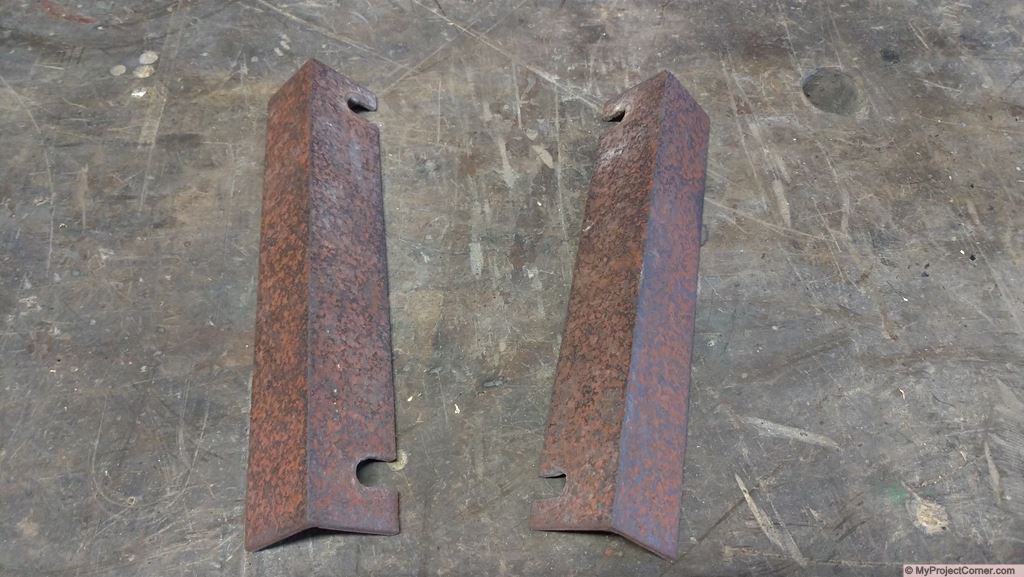
- Cut, drill and slot securing angles
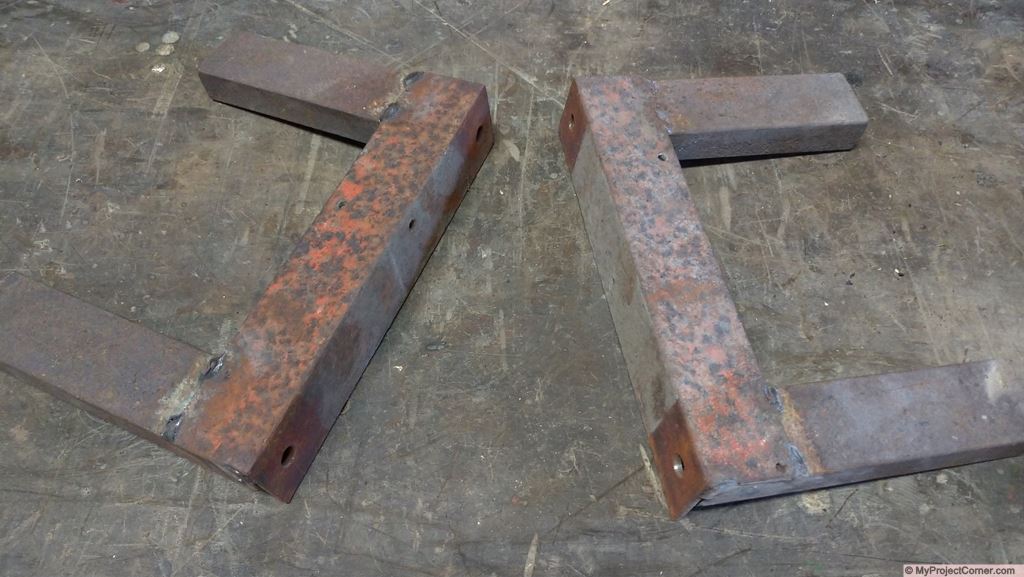
- Cut and weld on legs on to bottom securing angles
- Assemble angles with fire bricks. I had to chamfer the external corners of the fire bricks to clear the inside radius of the steel angle
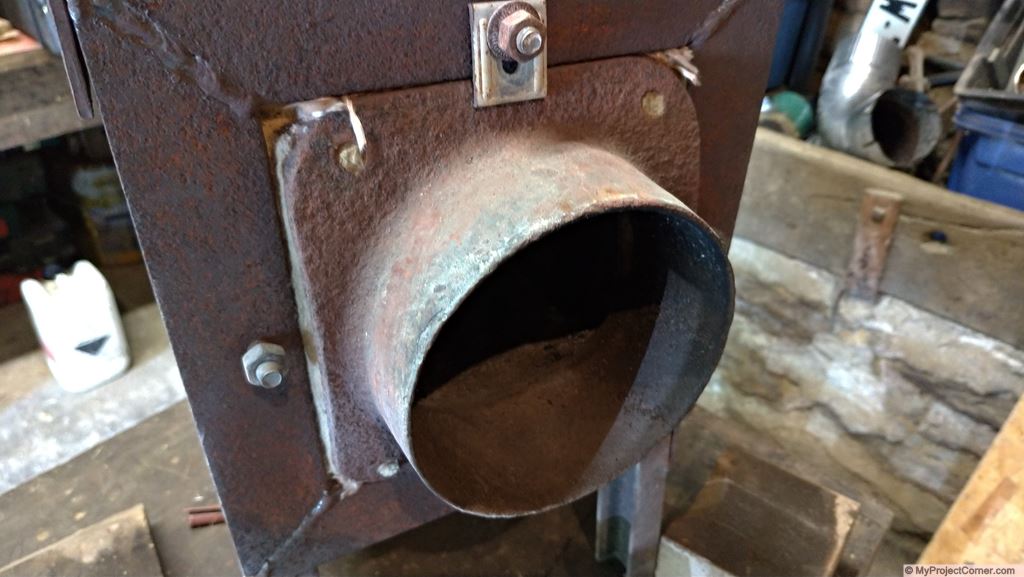
Flue Mounting
I was fortunate enough to find a cast iron flue pipe outlet on an very old word burner that I had in the corner of my barn, I tend not to throw anything away just for this reason. It was a perfect fit, just needed to fill in a couple of gaps (the wood-burner it came off of was round) with door sealing cord.
Feeding the wood pellets
Finally I built the hopper and feed tube assembly, as I said on the main page of this project I’m not happy with this part of pellet stove and will be remaking it before next winter. When complete I will add details in an update post.
However this is the current set up which still works pretty well, even if not perfect.

The pellet combustion chamber
Once the fire box had been built, I had to construct a grill type of chamber to hold the pellets while they burnt. This has taken a few attempts to get right (in fact I still experiment to try to fine tune/improve).
Example 1
I started with a wide ‘V’ constructed from steel round bar, but because of the high temperatures it burnt out in a very short time.
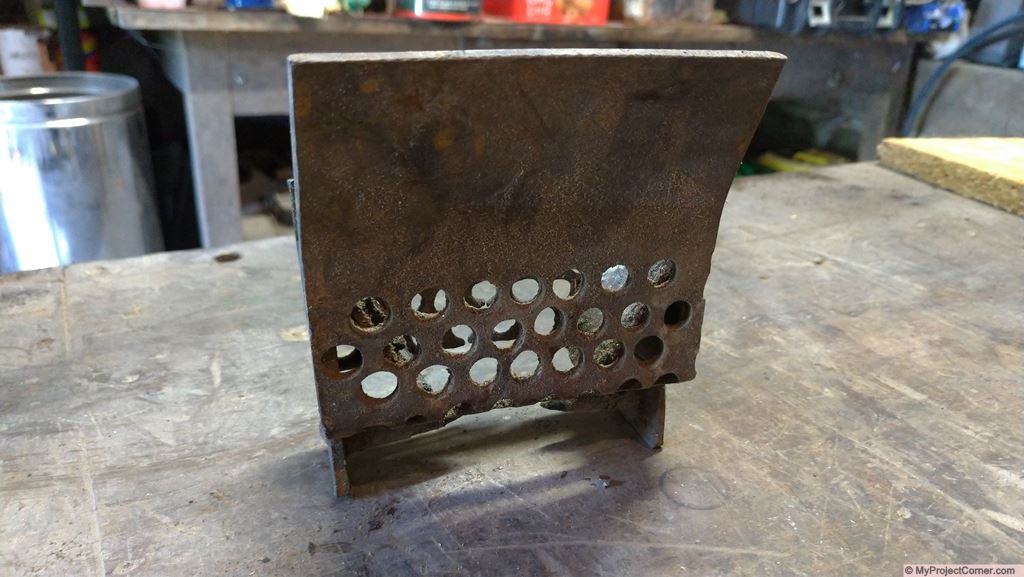
Example 2
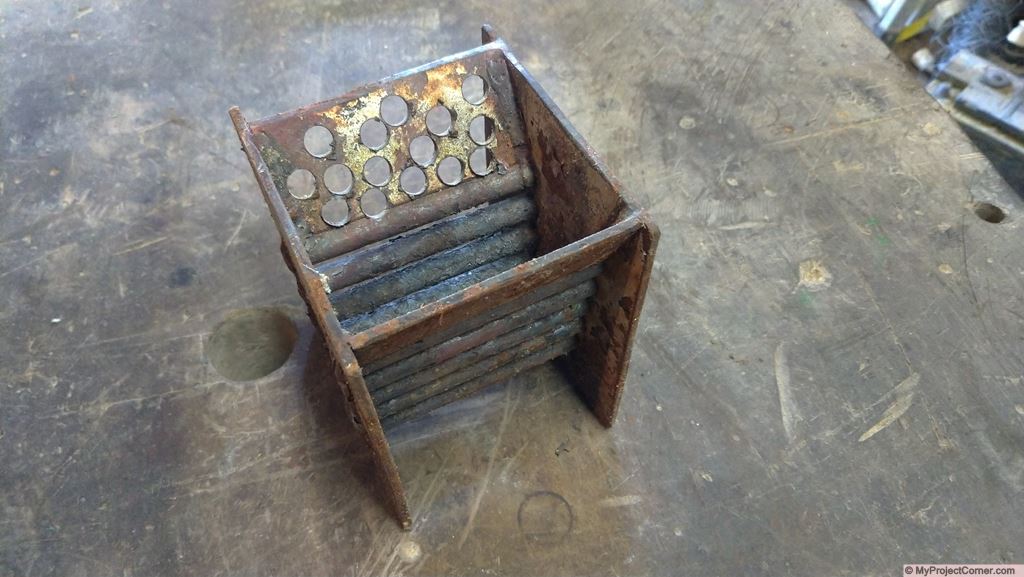
I found some 3mm thick 304 st/steel sheet and re-made the unit by drilling lots of holes (use plenty of oil to stop the drill bit burning out). This one worked a lot better, and although there was some deformation due to the heat, the unit didn’t fail. It did however, after a period of about 90 minutes, clog up with ash and throttle the pellet rocket stove.
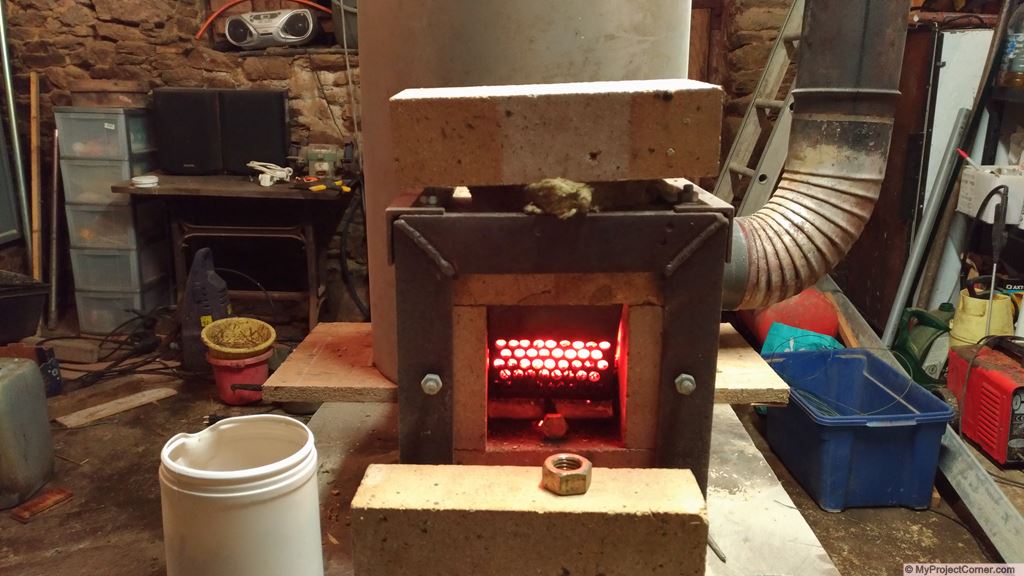
Example 3
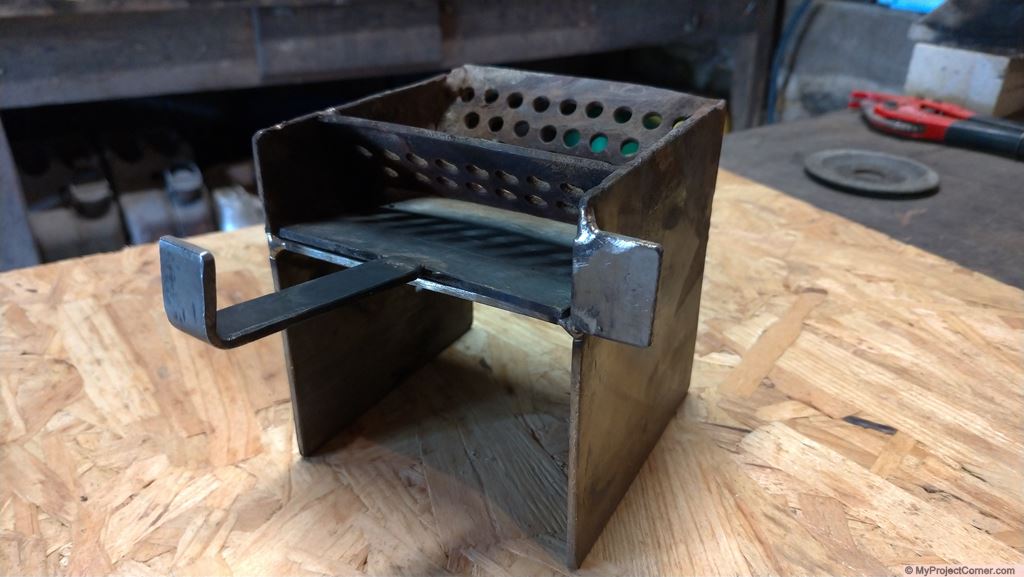
This shows my latest design, which has been in 24 hour operation for 4 months. I still had a issue with ash build up, but this is overcame with a simple servo setup run by an Arduino UNO (see below)
A short video of the pellet stove
Heat Transfer/Recovery
Transferring the heat to underfloor heating system
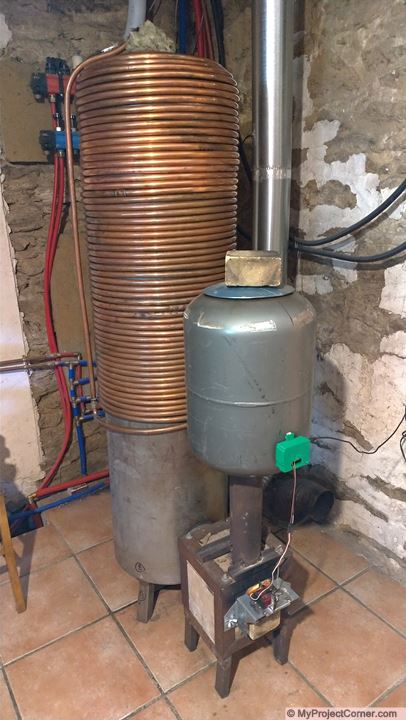
Next, to transfer the heat from the pellet rocket stove to the underfloor heating system. My underfloor heating system consists of PER tubing circulating water which should ideally be at 30 °C. I installed a 60 liter header tank (open system) and a central heating circulating pump to circulate the water from the tank to the coils of copper tubing wrapped around the heated chamber.
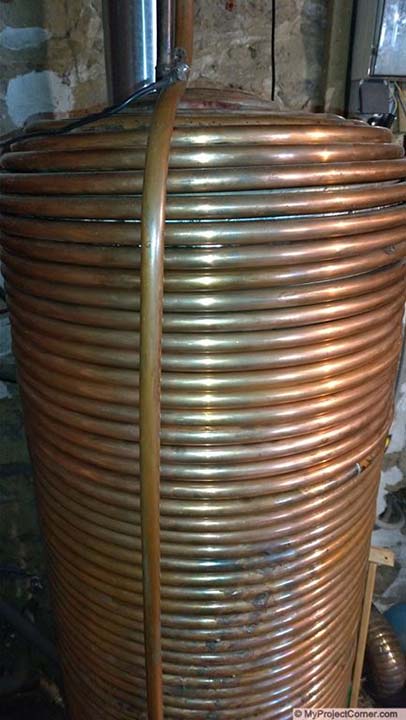
Using three 25 meter coils of 14/16 diameter annealed copper pipe. This was the most expensive part of the whole installation (92€ per coil in 2018). The three coils are soldered together. There is space for one more coil, which I may add in the future. This part of the build was fairly simple as the coils of annealed copper pipe was already practically the same size as the tank that it is wrapped around.
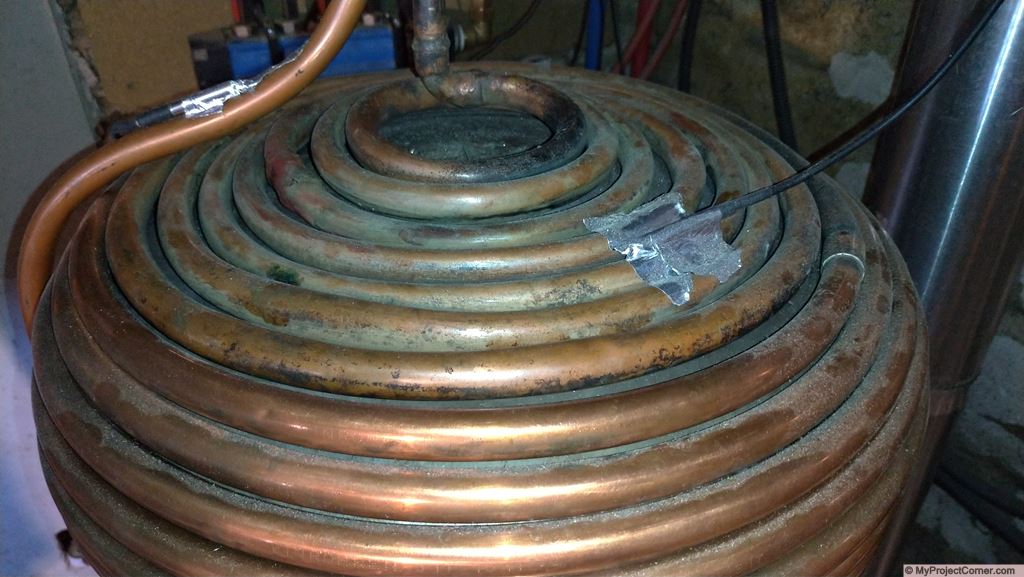
The most difficult part was forming the tight coils for the top of the tank. To achieve this I packed the pipe with fine sand before sealing the ends by flattening to pipe. Then using a wooden disc as a template, forming the pipe into the spiral. This gave me a bit of a headache and in the end I made it in three parts and soldered them together.
I’ve attached three DS18B20 sensors to monitor water in, water out and flue temperatures. These are connected to the Raspberry Pi which controls pumps and monitors the system.
Solved using an Arduino Uno
A very basic set up to clear the build up of ash, programmed to operate at regular intervals. Once installed the pellet rocket stove would run unattended for 10 to 12 hours. The time it took to empty the hopper.
Overcoming ash build up problem
To overcome the build up of ash I came up with this simple Arduino servo set up. It runs on a basic timer so as to ensure that the combustion chamber doesn’t become clogged up with ash.
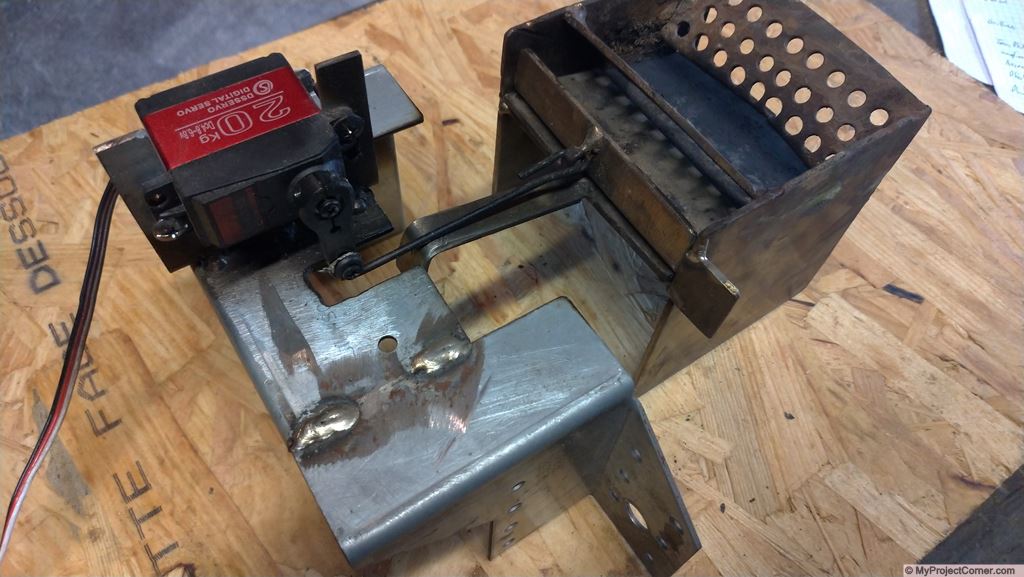
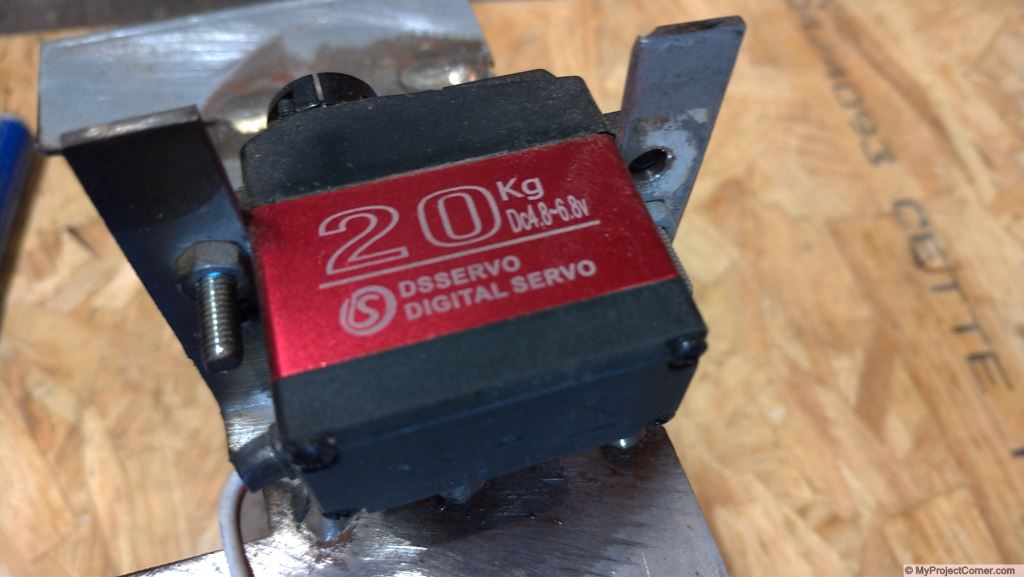
I used a 20kg force servo designed for radio controlled model applications, mounted on the front of the rocket stove fire box and connected to an Arduino UNO (generic). At a programmed regular interval the servo actuates a plate which clears any ash which has built up in the combustion chamber.
I used a couple of left over roofing attachments to make up the framework to hold the servo.
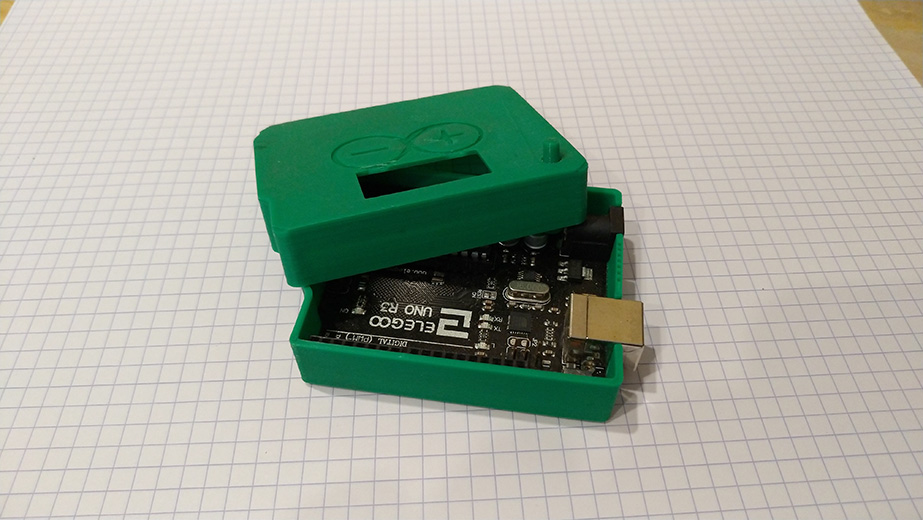
The 3D printed box is the same as was used for my temperature and timer unit, with the addition of a reset button. I left the window in the box to possibly add a 4 digit LED screen as a countdown timer later on.
#include <Servo.h>

Servo myservo;  // create servo object to control a servo
// twelve servo objects can be created on most boards

int pos = 0;    // variable to store the servo position

void setup() {
  myservo.attach(9);  // attaches the servo on pin 9 to the servo object
}

void loop() {
  for (pos = 0; pos <= 100; pos += 1) { // goes from 0 degrees to 100 degrees
    // in steps of 1 degree
    myservo.write(pos);              // tell servo to go to position in variable 'pos'
    delay(15);                       // waits 15ms for the servo to reach the position
  }
  for (pos = 100; pos >= 0; pos -= 1) { // goes from 100 degrees to 0 degrees
    myservo.write(pos);              // tell servo to go to position in variable 'pos'
    delay(15);                       // waits 15ms for the servo to reach the position
  }
  delay(900000);
}
Video of the Servo in operation
The Arduino servo controller attachment works very well, it’s very reliable and allows for continuous operation of the pellet stove system.
A future improvement could involve connecting to the Raspberry Pi which controls the heating system, to enable automatic operation when the stove is lit.
The wood pellet rocket stove in operation
Overall I’m very happy with the results from my gravity fed pellet rocket stove. Reduction in our firewood consumption has been enormous, our two wood burners have only been lit a couple of times a week (and generally just in the evening). As far as wood pellets are concerned, we have been averaging around ten 15 kg bags per week, which makes it a lot cheaper than logs.
When in operation, the flue temperature ranges from 70 to 85 °C with no smoke output (you can’t tell if it’s alight from outside).
I would like to couple the pellet stove with a DIY solar collector system, to further reduce the consumption of pellets, especially in autumn and spring.
Problems with the wood pellet rocket stove design
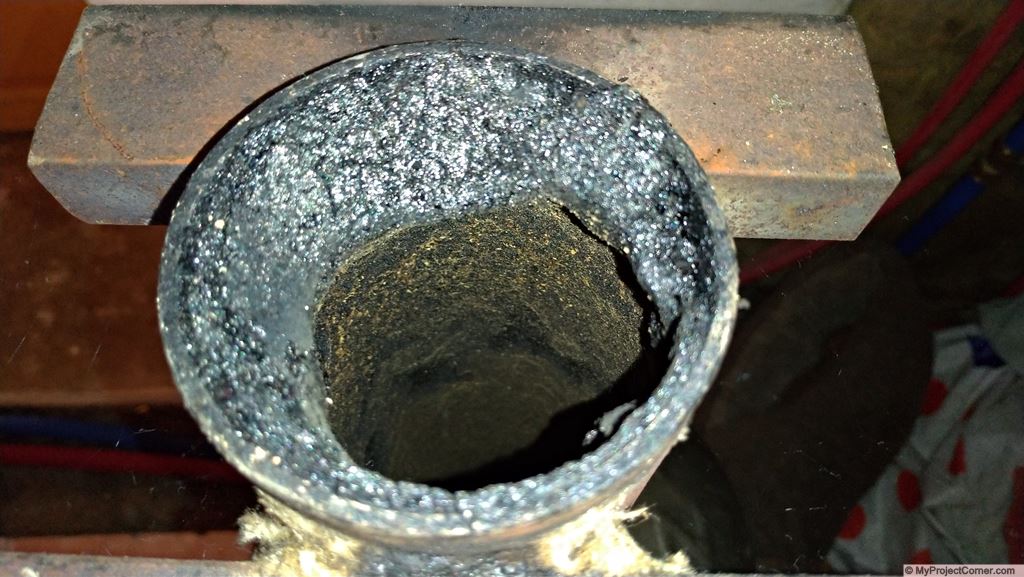
I have found that after running for 3 to 4 days continuously that there is a build up of tar towards the bottom of the pellet feed pipe. I think that this may be due to the steel pipe. (picture below)
Also, although not exactly a problem, the hopper made from an old gas bottle is curved where it is welded to the feed pipe, therefore a quantity of pellets stay in the hopper. This means that if I want to let the fire burn out to be cleaned or carry out maintenance, I have to be there to brush the last of the pellets into the feed pipe.
Future improvements to the pellet rocket stove
Experiment with the feed set up, possibly add another fire brick to the distance the steel feed pipe from the combustion chamber. I think this would reduce the tar problem.
Build a new hopper, making it slightly larger to have a full 24 hour burn time and to ensure all the pellets feed into the fire.
Add another 25 meter coil of copper pipe to the existing to transfer more heat.
Make some type of jacketed insulation to cover the copper coils.
Pretty it up a bit with some heat proof paint.