Homemade Chicken Plucker Featherplate
After two years of service, I did a complete dismantle to check for wear and tear. The durability of the OSB3 featherplate was my main concern because of the impermeability of the board.
Normally, the featherplate would be machined from aluminum or stainless steel. But because of availability and shipping costs I decided to find an alternative method of manufacture.
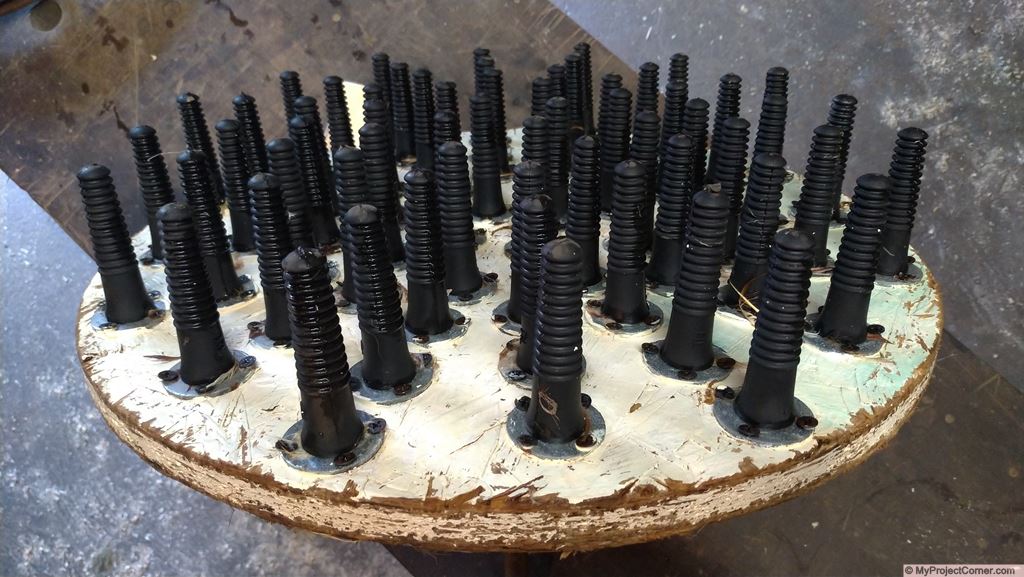
After researching various chicken plucker builds online, I made the featherplate out of a piece of 22mm OSB3 boarding that I had left over from boarding the attic. Along with large washers drilled with four holes to secure the rubber fingers to the board in recessed holes.
Though this type of boarding is resistant to humidity, it is not supposed to be in direct contact or immersed in water. After the featherplate had been assembled I gave it a coat of water-based paint to help to seal the surface of the OSB board.
I considered that even if the DIY featherplate made from OSB3 only lasted two or three years. It would not take very long or cost very much to make a replacement.
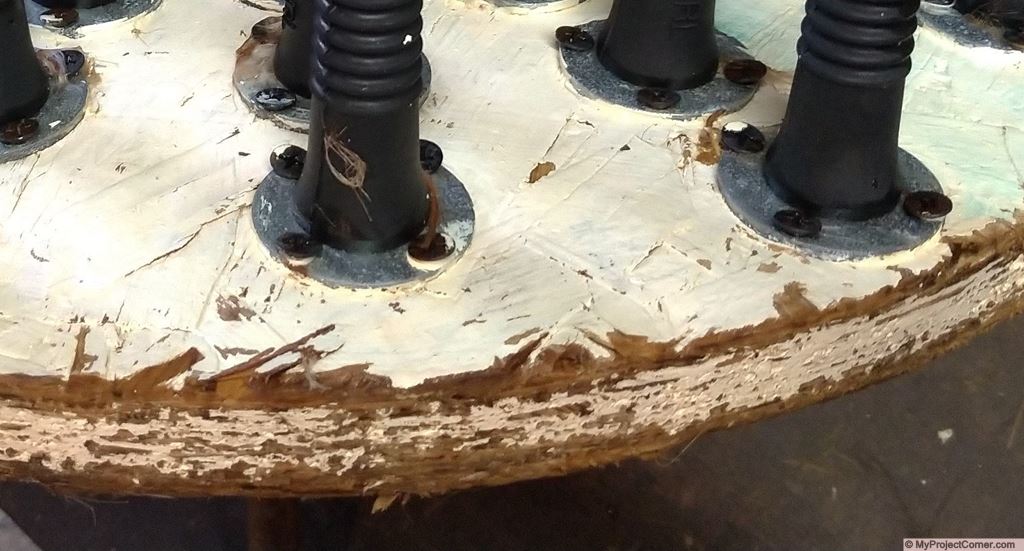
On inspection, I found that the featherplate is suffering from a small amount of water penetration. As seen in the photo below, the edge of the disk is slightly damaged. But because the water damage is so minimal I’ll be putting it back together as it is.
Most of damage has been caused by the issue with the chicken’s leg, which occasionally getting caught between the plate and the drum. This wears the paint off and allows the water to contact with the surface of the wood.
As far as the rubber fingers go, I didn’t notice any deterioration or damage to them, and are all still securely attached.
It’s been two years since I first built my Whizzbang Style Chicken Plucker, and we have put about 200 chickens through it.
There are a couple of small problems, but overall, I am really pleased with it. The processing of our chickens has speeded up enormously.
The problems encountered during the operation of the chicken plucker
The first is that the removed feathers do not wash out from under the featherplate extremely well and tend to build up at the top of the chute blocking it.
I had seen other chicken pluckers with a rubber finger or two on the underside of the featherplate. I didn’t do this which is probably why it blocks up. But saying that, I’ve made a hook from a length of steel rebar and clear the blocked manually from time to time. So, it’s no big deal.
The second is that the chicken’s legs sometimes get trapped between the edge of the featherplate and the drum. This could possibly be alleviated by re-making the featherplate disk larger.
But if I reduced the gap between the plate and the drum it could result in the removed feathers not washing away. Although I’ve found that removing the leg below the thigh before putting the chickens in the chicken plucker they don’t get stuck.
Because the damage to the featherplate is only superficial. The chicken plucker has been greased, re-assembled and made ready for the next batch of chickens.